British Columbia First Nations' Fill Management Guide
QS-6389-000-EE-A1
Catalogue: R5-658/2018E
ISBN : 978-0-660-24685-7
© Her Majesty the Queen in Right of Canada, 2018
PDF Version (2152 Kb, 45 Pages)
Table of contents
- Introduction
- Purpose and Limitations of this Guide
- Section 1: Understand the Laws, Regulations, and Requirements
- Section 2: Identify the Right Kind of Fill for the Project
- Section 3: Before You Accept Any Fill, Plan For It
- Section 4: Screen and Monitor All Incoming Fill and Reject Bad Fill
- Section 5: Place and Pack the Fill Correctly
- Conclusion
- Appendix 1: List of Regulatory Instruments
- Appendix 2: Indian Reserve Waste Disposal Regulations Permitting
- Appendix 3: Example of a Fill Import Questionnaire and Declaration
- Appendix 4: Example of a Fill Import Checklist
- Appendix 5: Example of a Fill Tracking Slip
- Appendix 6: Fill Management Projects at a Glance
Introduction
The Government of Canada is committed to helping First Nations manage reserve lands and resources and fully take part in the Canadian economy. For some projects on-reserve, it is necessary to bring in fill. For example, to build a sports field on low- lying land, fill might be needed to raise the surface level.
When fill is brought onto reserve land, including Certificate of Possession land, the fill can affect the whole community for many years. The effects might be good or bad.
- Good: Clean fill that is the right kind for the project can make reserve lands more useful. It can also create benefits such as jobs, profits, or new opportunities. These benefits might be felt by the person or business that uses the fill or supplies the fill. Or they might be felt by the whole First Nation.
- Bad: Using dirty fill or the wrong kind of fill can cause serious problems. For example, heavy rains can wash loose fill into streams where fish live; dirty fill can get into drinking water and make it unsafe to drink; land can become unsafe to play on; or the fill under a building might not be stable, and the building might not be safe. These are just a few examples. Because of problems such as these, your First Nation might not be able to use the land the way they want to. They might even have to remove and replace the fill, which could be very expensive.
The British Columbia First Nations' Fill Management Guide will help explain how to manage fill coming onto First Nations reserve land. It will enable First Nations to:
- Be aware of the laws and regulations related to fill projects
- Understand that many fill projects require special expertise beyond this brief guide
- Choose the right locations for projects and to prepare the locations for filling
- Choose the right kind of fill for the desired use
- Screen the fill before it leaves the source site to confirm that it is clean and the right kind
- Monitor the fill as it is delivered
- Place the fill at the site in the correct way
- Work with CP holders and help support them in their fill needs
The word "fill" can refer to various types of material (e.g., soil, construction waste, lumber, garbage, etc.). The only fill that can be accepted onto reserve land is clean, mineral soil or topsoil (see Table 1).
Purpose and Limitations of this Guide
The purpose of this guide is to help you, the First Nation or Certificate of Possession holder, reduce the risks associated with managing fill projects on-reserve. It will provide advice on how to choose the right kind of fill for your project. The guide will explain how to check the quality of the fill so that you can be sure that only clean soil is used for your project and will introduce to you the basics of placing the fill properly. It will also explain the importance of obtaining and keeping paper records of all the fill that you receive.
This guide provides advice about using general fill or topsoil for:
- Areas designated as residential, commercial, or agricultural land
- Residential or landscape filling, such as backfill or levelling
- Raising the level of the land over a large area
- Isolation berms (e.g., for privacy or to block noise)
- This does not include the outside face of dykes along waterways
This guide is for fill that will be:
- Less than three metres thick when complete
- At least 30 metres away from any fish-bearing waterbodies (e.g., rivers, streams, lakes, wetlands, oceans, etc.)
- 30 metres is the general standard. See "Special Fill Situations" for distances less than 30 metres
- The word ‘streams' includes intermittent streams, which sometimes flow and sometimes dry up
- On a slope of no more than 20 per cent
- This equals one metre rise in five metres horizontal
Disclaimer Statement
This guide provides only basic, general information. Do not use it as your only source of advice.
If you are planning a fill project, you will need advice about all aspects of your project. These aspects include, but are not limited to, the environmental context and legal requirements of your project. You must seek complete and up-to-date* information.
*Up-to-date as of when you begin planning your fill project
You must also obtain your own advice from one or more of the following: a lawyer; a suitably qualified contractor, engineer, or environmental specialist; and/or other experts, as needed (e.g., Department of Indigenous Services Canada (DISC) or Fisheries and Oceans Canada representatives).
Be sure to get legal advice about getting and placing fill for your project. You will need to understand:
- Contracts
- The laws about how you must prepare for receiving fill and how you obtain and place the fill
- The kinds of risk that you might take on, including the risk of losing money
- Other legal issues that your project might have
DISC recommends that you obtain legal advice regarding all contracts.
You might wonder where to find specialists such as environmental consultants, geotechnical engineers, and others. You can get the names of these experts through their professional associations. Examples of professional associations include, but are not limited to:
Special Fill Situations
Any fill situation that does not meet the above criteria is a special fill situation that requires specialized assessments not discussed in this guide. For example, the guide is not to be used for any of the following:
- Placing construction fill (e.g., for a structure, road, or utility)
- Placing fill behind a retaining wall
- Placing fill behind a structure that allows steep edge slopes
- Emergencies in which fill is placed to protect life, health, or the environment
- Waste landfill sites
- Any other operation meant to accept fill of poor quality (e.g., compost, wood waste, demolition waste, or garbage)
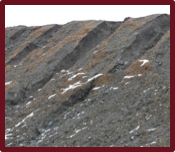
Slope with failures.
Sides are too steep
and are not well packed.
In general, special fill situations will require approval and permits, professional engineered plans and drawings, and can be subject to laws and regulations for fill placement.
If you are filling an area for a structure, road or utility, consultation with geotechnical engineer will be required.
If you wish to place fill within 30 metres of an active or intermittent stream, you will need to talk to DISC and Fisheries and Oceans Canada.
Warning
A thick layer of fill can be very dangerous. It can give way like a landslide. If you plan to place fill more than three metres thick, seek advice from a geotechnical engineer. The fill could slide if it is not placed the way the engineer recommends.
Before the Project Starts
To help promote the success of your fill project, read this guide before you start and follow the recommended best management practices it describes. The steps below will be explained in more detail throughout the text. You should include them as best management practices for every fill project:
- Know your legal obligations (See Section 1).
- Identify the right kind of fill for the project (See Section 2).
- Plan ahead to make sure your fill project will operate smoothly and safely (See Section 3).
- Carefully screen fill before it leaves the source site (See "Carefully Screen Soil from a Site Before You Receive It" in Section 4).
- Monitor every load of fill that arrives on-site (See "Fill Monitoring" in Section 4).
- Insist that every truckload arrive with all the correct paperwork completed
(See "Fill Tracking Documents" and "Carefully Screen Soil from a Site before You Receive It" in Section 4). - Understand how to place and pack the fill in the most suitable way for your project (See Section 5).
Section 1:
Understand the Laws, Regulations, and Requirements
Legislation and Regulations
To accept and place fill onto First Nations reserve land, you need to follow all applicable environmental laws. These may include acts, regulations, First Nations' by-laws, and codes. Some of the main acts and regulations related to fill operations are listed below along with summaries of their most important requirements. This is to give you a brief overview, and should not be considered as the only legal requirements you'll need to follow.

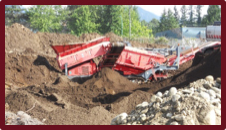
Improper disposal
of waste materials.
While Appendix 1 provides a more complete list of laws and regulations that could apply to your project, it is recommended that you seek out a qualified environmental professional or a lawyer to get a full understanding and advice on which laws and regulations you'll need to follow.
Note that laws and regulations are updated occasionally, so please make sure you obtain the most up-to-date version of the acts, regulations, or other documents.
If your nation is under a treaty or under the First Nation's Land Management Act, or has environmental by-laws in place, you will need to determine what other requirements there might be in relation to your fill project.
Indian Reserve Waste Disposal Regulations (IRWDR) (C.R.C., c. 960)
Before accepting any fill onto your land, contact the Environment and Natural Resources unit of DISC BC Region.
To contact DISC BC Region, call (local) 604-775-5100 or (toll-free) 1-800-567-9604 or email infopubs@aandc-aadnc.gc.ca.
Key requirements:
- The Indian Reserve Waste Disposal Regulations (IRWDR) regulate the disposal or storage of waste on First Nation reserves.
- Only under a permit or Minister approval can a person operate a garbage dump or use any part of the land for disposal or storage of waste.
- You need to obtain an IRWDR permit if you plan to accept garbage, demolition waste, or non-mineral soil (e.g., organic waste) onto your site. The term "waste" can also refer to mineral soil.
- If you receive garbage, demolition waste, contaminated soil, or other contaminated fill, such as organic waste, without a permit, you are breaking the law.
- If you plan to operate a garbage dump or waste landfill, you will need to follow many laws and regulations. It is beyond the scope of this guide to address garbage dumps and waste landfills.
Fill Permitting Procedures
Under the IRWDR, DISC is responsible for issuing fill site permits (See Appendix 2).
To obtain a fill site permit from DISC, the person who wants to receive fill must provide a fill deposit plan. This person is called the receiver and could be a Certificate of Possession Holder, a First Nation, or a third-party proponent. He or she might also need to do the following:
- Obtain security for remediation: This is a bond or letter of credit from the receiver. It assures that the fill project will be completed in a satisfactory manner.
- Conduct fill screening: The receiver might have to state that they will screen the fill. This is to make sure it will meet the needs of the project and of the site.
- Conduct fill monitoring: The receiver might have to agree to hire a qualified person to monitor fill loads as they arrive on site. This person will reject the fill if its quality is not high enough.
For more about fill screening and monitoring, see Sections 3 and 4 of this guide.
Fill sites on any reserve will need permits, fees, haul routes, and/or operating procedures. The receiver will need to talk to both DISC and the Band Council to find out what is required.
Fisheries Act (R.S.C., 1985, c. F-14)

or that are connected to
fish-bearing waters.
Key requirements:
- Do not alter any waterbodies (including active streams, intermittent streams, lakes, wetlands, etc.) that are fish-bearing or that are connected to fish-bearing waterbodies.
- Make sure fill does not enter these waters.
- Do not place fill within 30 metres of these waters.
- Maintain and refuel equipment and store and use chemicals at least 15 metres away from these waterbodies.
- Have a spill kit ready for any form of chemical or fuel spill.
Contaminated Sites Regulation (CSR) (BC Reg. 375/96)
Most reserves are governed by federal laws, not provincial. However, the available fill-related federal information and guidance might not answer all your questions. In this case, the provincial laws and regulations might be helpful for reference. DISC suggests that you contact the BC Ministry of Environment and Climate Change Strategy as a starting point to obtain more information.
Key requirements:
- BC's Contaminated Sites Regulation (CSR) deals with contaminated soil on provincial land in BC.
- It applies to former reserve lands that are now subject to provincial law. This could be because of a sale or because of a treaty with the First Nation.
- Where the Federal contaminated site guidelines do not apply or do not address an issue, the best practice is to follow the BC CSR, as follows:
- Fact Sheet 1: "An Introduction to Contaminated Sites in British Columbia"
- Technical Guidance 1: "CSR Site Characterization and Confirmation Testing"
Health and Safety
It is very important to follow the laws, regulations, codes, and standards that protect workers and the public. These include the following:
- Canada Labour Code (R.S.C., 1985, c. L-2)
- Workers Compensation Act [RSBC 1996] Chapter 492
- Occupational Health and Safety Regulation (BC Reg. 296/97)
- Hazardous Products Act (R.S.C., 1985, c. H-3)
- Transportation of Dangerous Goods Act, 1992 (S.C. 1992, c.34)
It is highly recommended that a qualified professional advise you of which laws and regulations apply to your fill project.
Section 2: Identify the Right Kind of Fill for the Project
When you plan a fill site, it is important that you consider the following:
- The area you need to fill and what it will be used for when it is complete
- The kind of fill that matches your needs
- How you will avoid receiving the wrong kind of fill or contaminated fill
Keep in mind that the wrong kind of fill or contaminated fill can put you out of compliance with laws and regulations. You could have to pay fines or pay to remove the fill and restore the ground. See Section 4 for details.
Only mineral soil and topsoil is acceptable on reserve land.
Why Do You Need Fill?
There are three types of activities that require specific fill:
- General filling – needs fill that will not decompose. Some uses are levelling land, filling in low-lying areas, or filling inside a dyke or berm. This fill cannot be used for the outside face of a dyke; it will not provide enough protection.
- Topsoil – needs good, clean soil. This is the upper 0.5 metres of soil suitable for gardens, lawns, or agricultural use.
- Construction – needs good-quality fill that can be compacted. This fill provides support for buildings, protection of life, or safety. As mentioned, this type of activity is not covered in this guide and will require
professional advice from a geotechnical engineer and other experts.
A screened topsoil, sand and gravel, and rocky soil
Silt (glacial till) used for a landscape berm
This guide only provides information about using general fill or topsoil for:
- Residential or other landscape filling – e.g., backfilling or levelling
- Raising the level of the ground surface over a large area
- Isolation berms (e.g., to provide privacy or block noise, but not for dykes along waterways)
If you need fill for any purpose other than these, consult with a geotechnical engineer and follow their advice.
Remember, this guide does not deal with garbage or waste landfills. Consult the appropriate experts and contact DISC staff for further information about required approvals.
To contact DISC BC Region, call (local) 604-775-5100 or (toll-free) 1-800-567-9604 or email infopubs@aandc-aadnc.gc.ca.

A First Nation fill site received various kinds of fill. The fill receiver was told that the soil was clean and suitable for the project. He planned to use the fill for a residential development. He thought that by the time houses were built, the wood waste in the fill would have degraded and the soil would have naturally compacted.
Years later, the residential construction project began. The geotechnical engineers checked the soil for construction and utilities support. The environmental consultant checked for contamination in the soil and groundwater. It turned out that the fill was too soft and variable, and there were random areas of contamination. Wherever buildings or roads were needed, all of the fill had to be dug out and replaced with expensive gravel from a pit. The removed fill also had to go to a contaminated soil landfill, which cost much more than was paid to the receiver to accept the fill in the first place.
Choosing Fill
Before you start any fill operation, think about the final use of the land surface. Will there be buildings, a garden, a playing field, or something else? If the wrong kind of fill goes in, it might all need to be taken out before the land can be used for these or other purposes. Choosing the right fill is one of the most important decisions to make. If you are not sure, get advice from a geotechnical engineer. See the next page for different types of fill.
Types of Fill
The following table describes common types of fill and what they are used for. Many, but not all, of the fill types are pictured after the table.
Table 1: Types of Fill
| Fill Type | Characteristics | Uses |
|---|---|---|
| River rock (rounded) Blast rock (broken) |
|
|
| Gravel – Uncrushed (pit run) |
|
|
| Gravel - Crushed and screened (road base) |
|
|
| Gravel - Clear crush |
|
|
| Sand |
|
|
| Silt |
|
|
| Loam |
|
|
| Topsoil |
|
|
| Clay |
|
|
Figure 1: Examples of Fill
Clean fill can be found in various forms. It can also be found as a combination of two or more fill types. The following nine pictures display examples of clean fill you could bring onto your site:
- Gravel – uncrushed (pit run)
- Gravel – clear crush, ¾"
- Gravel – clear crush, 1"
- Sand
- A mixture of sand and silt
- Silt
- Sandy loam – loam with a higher proportion of sand
- Sandy loam topsoil – loam with organic matter and a higher proportion of sand
- Clay

Terms Used and Misused
Some fill-related terms are misused. The following table explains what various terms mean and do not mean.
Table 2: Misused Terms
| Term | Means | Often Misused to Mean |
|---|---|---|
| Clean fill |
|
|
| Free fill (no-cost) |
|
|
| Inert fill |
|
|
| Hardpan, till, or glacial till |
|
|
| Pit run |
|
|
Section 3: Before You Accept Any Fill, Plan For It
Once you have identified the right kind of fill for your project, the next step is to plan how to receive it. There are three main aspects to this planning:
- A fill deposit plan
- A plan to control erosion and to protect streams
- A health and safety plan
Prepare a Soil Deposit Plan
The fill receiver must prepare a fill deposit plan with help from a qualified environmental professional and/or engineer. This will be approved by the Band Council, the Certificate of Possession (CP) holder (if applicable), and/or DISC, as appropriate, and will include:
- A plan view showing:
- The extent of the fill area
- The distances to nearby residences, streams, roads, utilities, and other important features
- A cross section of the fill site showing:
- Existing and final elevations
- Storm water and erosion controls, if needed (e.g. ditches, grading, silt fences etc.)
- Hours that fill will be received (e.g., Monday to Friday, 8:00 a.m. to 6:00 p.m.)
- A restoration plan that restricts fill with high organic content to suitable areas
The fill deposit plan should expire or require annual review and renewal. The review should be completed by a certified, third-party waste auditor. This enables the Band Council to check operations and ask the receiver to make changes, if needed. Sample Soil Deposit and Cross Section plans are shown in Figures 2 and 3.
Figure 2: Sample Soil Deposit Plan
This diagram shows the type of Soil Deposit Plan that you can use for your project. A Soil Deposit Plan should include a depiction of the following:
- A title indicating the property name (e.g., lot number, address, etc.)
- Lot line
- Road access and utilities (e.g., overhead power and buried water and sewer, etc.)
- The nearest house or any other structures and their distance from the fill
- The thickness, width (metres east-west), and length (metres north-south) of the fill area
- The location of any silt fencing
- Any nearby waterbodies, including swampy areas, and their distance from the fill
- An arrow pointing north
- The scale of the map
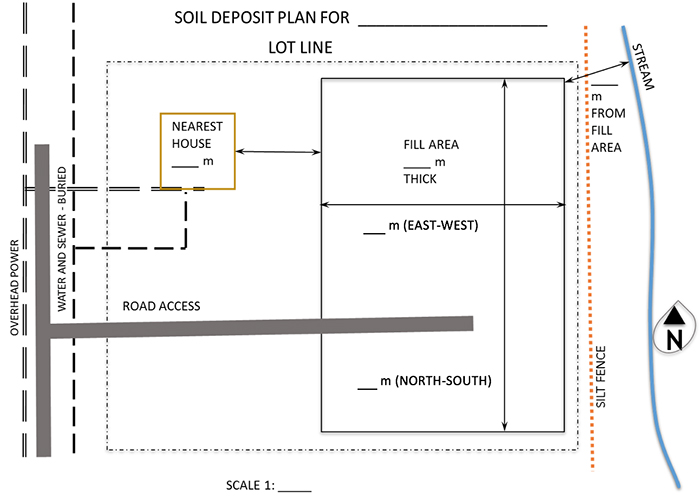
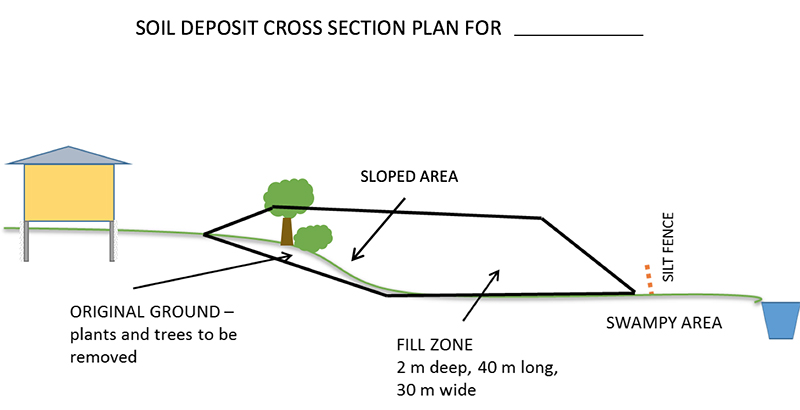
Figure 3: Sample Soil Deposit Cross Section Plan
Like the Soil Deposit Plan, the Soil Deposit Cross Section Plan should also depict the following:
- A title indicating the property name (e.g., lot number, address, etc.)
- The thickness, width, and length of the fill zone
- Any nearby waterbodies and their distance from the fill zone
- The location of any silt fencing
- Any structures or buildings and their distance from the fill
- Any nearby waterbodies, including swampy areas
In addition to these, the Cross Section should also display the following:
- Sloped areas of the land
- Original ground, showing plants and trees to be removed
How to Prepare for and Prevent Erosion and Slope Failure

Mulch, a silt fence, and gravel
all protect water in a ditch.
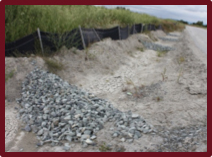
A gravel check-dam in a
drainage ditch with a silt fence.

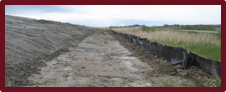
Fill applied in thin layers,
with a silt fence at the base
of the fill. Grass is maintained
on the edge of the drainage.
"Slope failure" means the fill is falling down. "Erosion" means the slope is washing or blowing away. If fill enters a watercourse, it can damage fish and fish habitat in many ways. You can prevent fill from reaching watercourses using the follow methods:
- Apply fill in thin layers, with edges sloped at no less than 1.5 metres horizontal to 1 metre vertical.
- Install a silt fence or another method of catching fill at the base of the fill zone. Other methods include hay bales, pea gravel dams, and ditches with dams.
- Reduce the speed of rain runoff by keeping the upper surface of the fill relatively level. You want the water to run off the fill surface, but not too fast. A slope from one per cent to three per cent is good.
- Divert water from flowing across the fill zone by using ditches, silt fences, and/or hay bales.
- Leave vegetation in place in areas beyond the fill zone.
- Plant grasses and shrubs in completed sections of fill, especially on slopes.
- Place rock or gravel on the exposed faces of the fill to reduce erosion. This is a good method if the fill is not going to be planted.
If you notice soil erosion or slope failure, call an expert (e.g., a geotechnical engineer) for advice on what to do.
Plan for Health and Safety
General Requirements
The Canada Labour Code applies to workers at fill operations. Also, BC has laws under the Workers Compensation Act, and specifically the Occupational Health and Safety Regulations, about worker safety that might apply. You will need to confirm which BC health and safety regulations apply at your site.
The following points are two of the most important health and safety requirements for construction type work:
- Site workers must wear high-visibility vests or clothing and protective footwear when they are not in a vehicle.
- The person in charge of the fill site must control dust at the fill site so that workers can see and breathe properly.
Traffic Control
Traffic control is important for routes to the site and on the site. Traffic management on the fill site makes it safer for everyone. The Band Council will have requirements about hours of operation and traffic routes. Also, receivers need to provide safe passage to and from the fill site for all road users. This includes vehicle and foot traffic. A few basic signs and controls significantly improve traffic flow and safety. Examples of signs are Entrance, Exit, Fill Site, and directional arrows. Examples of controls are cones, delimiters, and marker tape.
Emergency and Spill Kit
An important best management practice is to have an emergency and spill kit on site. It should contain at least the following items:
- First aid kit
- Eye wash station
- Fire extinguisher
- Shovel
- Rubber gloves
- Absorbent pads for oil and fuel
- Plastic bags for used absorbent
Section 4:
Screen and Monitor All Incoming Fill and Reject Bad Fill
You must be careful to avoid having poor-quality (e.g., wrong type of fill for the project) or contaminated fill dumped on your site. To achieve this, you must:
- Understand what fill is acceptable and not acceptable
- Screen the fill before it leaves the source site
- Monitor the fill as it arrives on-reserve
These three points are explained in the following sections.
Unacceptable Fill Materials
Someone must check every load of fill that arrives on the site. This person needs to know what kind of fill to accept or not accept.
Material that is Not Soil
Material that is not soil is not acceptable as fill.
Fill that contains any amount of these materials is not acceptable:
- Residential or commercial garbage
- Material from ditch cleaning
- Metal waste
- Industrial waste
- Plastics
- Asphalt pavement
- Food or fish waste
- Concrete or brick
- Road sweepings
- Wood (e.g., trees, branches, and lumber)
- Construction waste
Unacceptable Soil
Any amount of soil is not acceptable as fill if it:
- Is from an industrial site
- An exception can be made if the soil is proven to be not contaminated. However, proving that soil is not contaminated is a job for an environmental consultant. You cannot do this on your own.
- Is from a contaminated site
- Is from a gas station
- Smells of chemicals or does not smell like garden soil
- Watch for gasoline, diesel, or chemical smells.
- Is stained black, red, yellow, or any other odd colour
- Is material dredged from the ocean floor
- Fisheries and Oceans Canada and Transport Canada must be involved with any ocean dredgeate.

Garbage is not acceptable as fill.
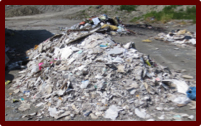
Drywall, concrete, and plastic demolition waste are not acceptable as fill.

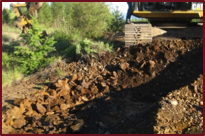
If you leave trees under the fill or use old stumps in the fill, they will slowly rot. When they rot, they leave an empty hole in the fill. It either becomes an air pocket or fills with water. Either way, it will create a sink hole or make the slope fail.
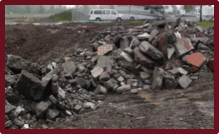
Asphalt and brick demolition waste are not acceptable as fill.
How to Reduce the Chances of Receiving Contaminated Fill
Why People Try to Dump Contaminated Fill on Reserves
In BC, it can be expensive to get rid of contaminated soil on Provincial Land. In comparison, dumping on Federal Land can be relatively cheap. Here is why there is a difference:
- Provincial Land. When a receiving site is under provincial law, it must have a fill site permit and a soil relocation agreement. This is required by the BC Ministry of Environment and Climate Change Strategy and makes soil disposal more regulated and expensive.
- Federal Land. Federal land, including reserve land, has its own rules (see Section 1). The BC laws often do not apply.
This means that contractors can save money by dumping poor-quality or contaminated soil onto reserve land. It is especially true for soil that is lightly contaminated. This soil might not smell, look, or seem contaminated. However, it could be contaminated enough that it cannot be safely used on residential, agricultural, or even commercial land.
If you come across any of the problems below, call an expert for help. This person needs to be a member of a BC professional association, like one of the ones listed earlier in this guide.
- Smelly, stained soil with an oily sheen
- Soil from a site that you suspect might be contaminated
How Soil Becomes Contaminated
Soil from residential or undeveloped sites is the least likely to be contaminated; however, spills and leaks can happen anywhere. Common sources of contamination include leaks from fuel tanks. Sometimes, above-ground tanks leak onto the ground surface. Other times, underground fuel tanks can leak. This situation can be very harmful because the tank can leak without anyone knowing. Fuel from these tanks can travel through the soil and groundwater and go completely unnoticed.
There are many other ways for soil to become contaminated, including from industrial or agricultural activities. For example, pesticides could leak from storage containers into the ground. This is why it is important to find out how the source site was used. Be suspicious of the soil if you think it comes from somewhere that could be contaminated.
Why You Want to Avoid Contaminated Soil
Contaminated fill can cause many long-lasting problems like the following:
- Health problems
- Reduction in land value
- Pollution of soil, groundwater, and surface water
- Loss of money from having to clean up or remove the soil if it is contaminated
A fill project almost always starts out as a good idea, and it might even be a way to make money. However, contaminated fill can turn the project into a problem very quickly. You and others members of your community could end up being seriously impacted. These impacts can include sickness and financial losses.
Carefully Screen Fill from a Site Before You Decide to Take It
There are steps you can take to reduce the chances of receiving contaminated fill that contains unacceptable material. Before you determine that fill from a particular site is going to be right for your project, you must screen it carefully and do the following:
-
Obtain a Site Profile from the fill provider. A Site Profile is a form that is part of BC's Contaminated Sites Regulation. It is used by BC Ministry of Environment and Climate Change Strategy to identify potentially contaminated sites. If the source site of the fill is on provincial land and has been identified as a potentially contaminated site, it is required to have a Site Profile. If this is the case, you are strongly encouraged to obtain it from the fill provider.
To find a copy of the Site Profile form, go to: Site remediation forms
Contact the BC Ministry of Environment and Climate Chance Strategy for more information.
- Obtain a clearance letter, if needed. If any information in the Site Profile indicates that the source land could have contamination, then you will need a clearance letter from an environmental consultant before you bring the fill onto your site. See item 4 in this list.
- Double-check the source. Use Google Maps (or a similar program) as another way to check the location and use of the source site. The information from Google Maps should agree with the information on the Site Profile form.
- Ask advice from a qualified professional. Many fill providers will have documents that they believe can be used to assess environmental quality of the fill. A common example is a geotechnical report. However, this type of report might not include the right kind of information. You might want to have a qualified professional review the information that fill providers give you. This professional can check whether the fill will (or will not) be suitable for your site. When in doubt, talk to a qualified professional.
- Be frank about site inspections and testing. Tell the fill provider that you will conduct routine and random site inspections and fill testing. These tests will be conducted to assess the fill quality. State that the provider will need to remove contaminated or unsuitable material at their own cost.
- Have a contract. Have the fill provider sign a contract or agreement with you. Hire your legal, engineering, and environmental experts to help you with the contract.
- Require a written statement. Require the company that delivers the fill to state, in writing, that the fill is not contaminated. Obtain legal advice about the wording used in your tracking documents and contracts. This wording affects your protection and your legal rights and obligations. See below for an explanation of tracking documents. One option is to include a statement by the fill provider in your tracking documents and your contracts or agreements. See sample wording in Appendix 4. Clearly state that the contractor depositing the fill will be responsible for removing the fill if it is found to be contaminated, or if it violates the declaration and removal clause.
- Document the source. Set up a system with the source site so that each truck leaving the source site has a fill slip with a unique permit number. This number will give you and your site operators a way to confirm the origin of the fill.
How bad can contaminated soil be? In an old mining town, they wanted to make a new softball field. There were piles of free fill from an old mine site, so they got some trucks and graders and laid out the fill to level the field. After a while, the fill started to turn a bright yellow colour. Within a few years, the groundwater was contaminated with arsenic. Dust from the field spread around the area whenever the wind blew. The dust also contained arsenic, which is toxic to people and animals. It was a good idea to make a baseball field, but the wrong fill led to a major problem.
DISC recommends that you obtain independent legal advice for this and all other contract-related matters mentioned in this guide.
Fill Tracking Documents
Fill tracking forms, also called manifests, are documents that can be audited (see list below). They trace the fill from source to final destination. There are three steps to consider when filling out a manifest:
Step 1 – Fill generator: The fill generator (the person who you are receiving the fill from) states the type of fill and where it comes from and then signs off on the fill.
Step 2 – Trucker: The trucking company that accepts the fill writes the load amount, truck number, and licence plate number and then signs off on the form.
Step 3 – Receiver: The receiver (First Nation, CP holder, and/or proponent) states where the fill was accepted; monitors, screens, and approves the load; and then signs off on the form. The statement names the reserve and states where on the reserve the fill was deposited (e.g., the specific area where it was unloaded).
For your reference, this guide includes the following sample tracking forms:
- Fill Import Questionnaire and Declaration (Appendix 3)
- Fill Import Checklist (Appendix 4)
- Fill Tracking Slip (Appendix 5)
Consult your lawyer and other expert advisors (e.g., environmental consultants) to prepare your own version of these documents. Tracking documents are done in carbon copy so that each person can keep a record of where the fill came from and where it ended up going. This way, if there is a problem with the fill, the First Nation can identify who is responsible for the problem.
Fill Monitoring
Know what material is acceptable and make sure all fill suppliers know what you will accept before they start to load a truck.
If you watch the fill as it is dumped and make sure it matches what the supplier said, you have a better chance of getting the fill you want and need without contamination and unacceptable material (refer to the Unacceptable Fill Material list in Section 4).
Follow the guidelines listed below:
- Do not allow after-hours or unattended dumping. Install a gate that is closed and locked when you are not present.
- Watch loads being dumped. Watch for garbage, smells, stains, or other signs of unacceptable fill. This way, you can make the contractor take back unacceptable fill right away. Also, the word will get out that you won't take garbage.
- Visually inspect every truckload of fill deposited on the fill site. The less checking you do, the greater the chance that contaminated soil or unacceptable fill will be deposited on the reserve.
- If you are doubtful of the fill quality, make sure it does not get mixed with other fill
or get covered. Examples of what to look for: suspicious materials in the soil, strange smells, oily soils, soil types that are different than previous loads, and any other traits that make the fill seem unusual or out-of-place. - If you are suspicious of the fill, instruct the company who provided the fill to remove it. Retain a suitably qualified environmental consultant to assess the fill and collect samples for analysis.
- Record the trucking company and the truck license number for every truck that deposits fill on your site. Ask each truck driver where they picked up the load. Require them to supply a permit number or Fill Tracking Slip (manifest) that proves the fill's origin.
- If you become apprehensive of trucks depositing fill on your site, call the source site and ask them to confirm that the trucking company name and licence numbers are correct.
- Send back any material that is not acceptable.
WATCH OUT!
Be extra careful if someone wants to dump:
- Smelly soil
- An unexpected load with a driver willing to pay cash
- Garbage
- One load only, near a commercial or industrial area
- Drywall, lumber, shingles, and other construction debris
- Material that is not soil – if it looks odd or out-of-place, it probably is not material you want at your site
Be Aware When Working with Contractors and Truckers
Most contractors are honest and ethical. However, getting rid of fill is expensive, especially if it is contaminated. As a result, some dishonest contractors might try to take shortcuts to save money. Be diligent and aware at all times, even with contractors you feel you can trust. Do what is needed to promote the success of your project while protecting the health and safety of you and your community, and avoid being held financially and legally responsible.
For example, be aware that even though a contractor has paperwork to prove that fill from a site is clean, the contractor might add fill from other sites. This is one reason it is so important to monitor fill as it arrives on-site. Also, operators in the transport and disposal industry will find out that you are receiving fill. Some of these contractors or truckers might try to sneak their loaded trucks into your fill site and dump contaminated or unsuitable fill.
Section 5: Place and Pack the Fill Correctly
Equipment
To place fill, you will need:
- A way of spreading the soil in a thin layer (e.g., a grader, loader, bulldozer, or excavator)
- A way to pack the soil (e.g., a compactor, roller, or any of the above equipment driving across the soil repeatedly)
Note: The packing equipment needs to be heavy enough to compact the bottom of the fill layer. The lighter the packing equipment, the thinner the fill layer must be for proper compaction.
Method
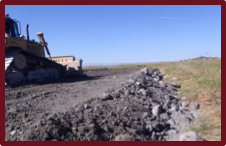
Levelling and packing of fill
Place the fill as explained below and illustrated in Figures 4, 5, and 6.
- Remove vegetation from the area where the fill will be placed.
- If the final use is general landscaping, then grasses and topsoil can be left.
- If the final use is structural, remove all vegetation and the topsoil.*
- Keep or reuse the topsoil for site restoration or revegetation.
- Spread the fill in thin layers 0.15 metre (six inches) thick or less (See Figure 4).
- Place the fill in layers and not on a slope.
- Keep dust down by spraying with a bit of water.
- Fill edges should not be steeper than 1.5 metres horizontal (H) to 1 metre vertical (V) (See Figure 5).
- Pack the fill until it is hard. You can use the boot test for compaction (See Figure 6).
*Reminder: This guide is not meant for guidance on large structures like houses, commercial buildings, etc. You will need advice from geotechnical engineers and other experts for these types of project.
Figure 4: Slope Edge Diagram
The Slope Edge Diagram should depict the following elements:
- The original ground
- The thickness of the fill (maximum 3 metres thick)
- The slope ratio - no steeper than 1.5 metres horizontal (H) to 1 metre vertical (V)
- The silt fence – maintain until vegetation is established
- Streams and other waterbodies and their distance from the fill edge
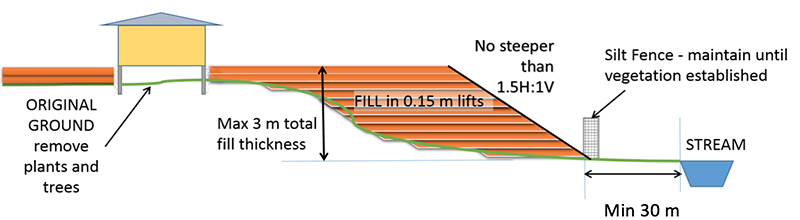
Figure 5: Slope Ratios
This figure depicts three examples of slope ratios:
- Failure likely – 1H:1V
- An incline of 1 metre horizontal or 1 metre vertical or steeper will likely result in a slope fail
- Minimum – 1.5H:1V
- The minimum slope of the deposited fill should be 1.5 metres horizontal to 1 metre vertical
- Very stable – 2H:1V
- A very stable slope will be 2 metres horizontal to 1 metre vertical

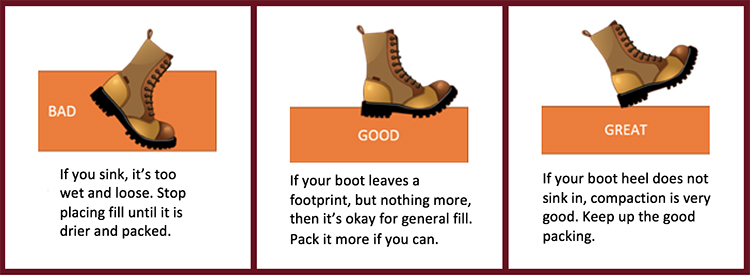
Figure 6: The Boot Test for Compaction
This figure depicts what to look for when conducting the Boot Test for Compaction so that you can know if you have packed your fill correctly.
BAD:
- If you sink, it's too wet and loose.
- Stop placing fill until it is drier and packed.
GOOD:
- If your boot leaves a footprint, but nothing more, then it's okay for general fill.
- Pack it more if you can.
GREAT
- If your boot heel does not sink in, compaction is very good.
- Keep up the good packing.
What Not to Do
To avoid problems:
- Do not dump fill in one large pile.
- Do not dump fill over the edge of a fill area unless you level it into thin layers (See Figure 4).
- Do not try to pack very wet soil. Leave it in a pile to dry. Only place and pack it when it is reasonably dry.
- Do not deposit fill within 30 metres of fish-bearing waterbodies.
- Do not deposit fill within three metres of utilities.
- Do not place fill more than three metres thick in total, except under the advice of a geotechnical engineer.
Erosion Control and Stream Protection
By planning ahead, you will be ready to control erosion and protect streams. For advice about erosion control and stream protection, see Section 3: Before You Accept Any Fill, Plan for It.
Fill Completion
A revegetated slope
Seed the area with grass or native plants as soon as possible. This will protect soil from rain and erosion. It will also enable you to grow the plants you want to grow, not weeds.
Wait for the fill to settle before putting small structures or improvements such as sheds, driveways, and the like. Air spaces happen during filling, and giving the fill a year to settle makes it less likely you will have an unexpected hole in your driveway.
Watch for slides, holes, and cracking. If you see them, obtain help from a suitably qualified professional.
Conclusion
Accepting fill onto reserve land can open up opportunities to improve your community. However, it is important to get all the information you need before starting a fill project. Being informed will help you protect you and your community from potentially contaminating or expensive fill issues.
A Summary of Best Practices for Fill Projects
To support the success of your fill project and reduce financial, environmental, and human health and safety risks, follow the recommended best management practices described in this guide. To summarize, you should include the following steps in each of your projects:
- Know your legal obligations (See Section 1).
- Identify the right kind of fill for the project (See Section 2).
- Plan ahead to make sure your fill project will operate smoothly and safely (See Section 3).
- Carefully screen fill before it leaves the source site (See "Carefully Screen Soil from a Site Before You Receive It" in Section 4).
- Monitor every load of fill that arrives on-site (See "Fill Monitoring" in Section 4).
- Insist that every truckload arrive with all the correct paperwork completed (See "Fill Tracking Documents" and "Carefully Screen Soil from a Site before You Receive It" in Section 4).
- Understand how to place and pack the fill in the most suitable way for your project (See Section 5).
If you're thinking about bringing fill onto your land, use this guide just to help you take your first steps. But remember! Don't use this guide as your only source of information. Seek advice from technical and legal experts, call a DISC representative, and talk to others who have successfully completed their own fill projects.
Appendix 1: List of Regulatory Instruments
This page lists the regulatory instruments (i.e., laws and regulations) that cover most aspects of fill site operations.
Note: Please be aware that other legislation and documents may also apply to a fill site operation. When in doubt, consult with a lawyer or a qualified environmental professional.
Be Sure You Have the Most Up-to-Date Version
This guide refers to various laws, regulations, and related documents. The provincial and federal governments change and update these documents from time to time. Please make sure you obtain the most up-to-date version.
Also, the web page hyperlinks in this guide are for convenience only. Be sure to check that the legislation or document is up-to-date and in force at the time you access the web page. When in doubt, consult with a lawyer or a qualified environmental professional.
Federal Legislation, Regulations, and Guidelines
- Canada Labour Code (R.S.C., 1985, c. L-2)
- Fisheries Act (R.S.C., 1985, c. F-14)
- Canada Water Act (R.S.C., 1985, c. C-11)
- Hazardous Products Act (R.S.C., 1985, c. H-3)
- Indian Act (R.S.C., 1985, c. I-5)
- Indian Reserve Waste Disposal Regulations (C.R.C., c. 960)
- Transportation of Dangerous Goods Act, 1992 (S.C. 1992, c.34)
- Canadian Council of Ministers of the Environment (CCME) Guidelines
British Columbia Legislation, Regulations, and Guidelines
- Environmental Management Act [SBC 2003] Chapter 53
- Contaminated Sites Regulation (BC CSR) BC Reg.375/96
- Fact Sheet #1: "An Introduction to Contaminated Sites in British Columbia"
- Technical Guidance #1: "CSR Site Characterization and Confirmation Testing"
- Water Sustainability Act [SBC 2015]
- Workers Compensation Act [RSBC 1996]
Appendix 2:
Indian Reserve Waste Disposal Regulations Permitting
This page provides a brief overview of the minimum requirements for obtaining a Waste Disposal Permit under the Indian Reserve Waste Disposal Regulations.
Note: For a more detailed explanation of the permitting process, contact the Environment and Natural Resources unit of DISC BC Region, toll-free at 1-800-567-9604, locally at 604-775-5100, or via e-mail at infopubs@aandc-aadnc.gc.ca.
A permit is required before waste disposal, storage, or burning can be carried out on a reserve. This permit will last one year, and must be renewed annually throughout the life of the project. To obtain a permit for the construction, expansion, or operation of a waste disposal site, the following documents are required:
- Project Description
- Operations Plan
- Closure and Reclamation Plan
- Environmental Site Assessment and Environmental Impact Assessment
- Waste Management Plan
The scope of each requirement listed above will depend on the characteristics of your project.
Appendix 3:
Example of a Fill Import Questionnaire and Declaration
Note: Be sure to update this form as best practices change.
Importing fill onto reserve lands can provide benefits. However, it can put health and land at risk if it is not done correctly. Only mineral soil or topsoil is acceptable as fill on reserve land. It must not contain contamination, organic waste, garbage, or other waste.
Provide the information below before importing fill onto reserve lands.
SOURCE SITE
Excavation contractor or site owner: ________________________________
Source site: ________________________________
Land use: Undeveloped Residential Commerical Industrial
Trucking firm: ________________________________
Number of trucks used: ________________________________
Date of haul start: ________________________________
Date of haul end: ________________________________
Total volume of soil: ________________________________
Attach a BC Ministry of Environment and Climate Change Strategy Site Profile form for the source site. Complete all of Sections I to XI and sign where shown.
Site Profile attached: Yes No
FILL RECEIVING SITE
Fill site permit number: ________________________________
Person(s) in charge of monitoring incoming fill: ________________________________
CERTIFICATION
See SAMPLE WORDING FOR CERTIFICATION (text below this table). Obtain independent legal advice on the wording to be inserted here.
Signed: I have authority to bind the owner and contractor ____________________(insert name of owner and contractor)
Signature: ________________________________
Representing: ________________________________
Print name: ________________________________
Date: ________________________________
Job title: ________________________________
ACCEPTANCE BY FIRST NATION RECEIVER
Accepted for deposit at: ________________________________
Signed: ________________________________
SAMPLE WORDING FOR CERTIFICATION
By signing below, I declare on behalf of the owner and contractor that the soil or fill provided does not contain any unacceptable materials. For this purpose, "unacceptable" is defined as follows:
- Waste material or soil with concentrations of contaminants that exceed the applicable residential, commercial, or agricultural standards at the receiving site.
- Note:
- See CCME Canadian Environmental Quality Guidelines.
- If there is no applicable federal guideline for a specific contaminant, see the Contaminated Sites Regulation (CSR) (BC Reg. 375/96).
- Note:
Further, I confirm on behalf of the owner and contractor that any unacceptable fill material delivered to the site will be removed at the owner and contractor's expense.
Appendix 4: Example of a Fill Import Checklist
Note: Be sure to update this form as best practices change.
BEFORE DELIVERY
- It has been determined that the fill source site is residential and non-contaminated.
- Fill type and grain size are appropriate for the intended use at the fill site.
- Fill Import Questionnaire and Declaration and Site Profile documents are completed and signed – no unacceptable materials, no boxes marked "Yes" on Site Profile form.
- If any of the boxes on the Site Profile are checked "Yes," the soil requires a clearance letter from an environmental professional.
- Fill site is cleared of vegetation.
- Silt control fences or other measures are in place to protect waterways.
- Equipment is available to spread, level, and pack fill in 0.15 m (six inch) lifts.
- Each load will be inspected for unacceptable materials.
- Lock gates to prevent access afterhours.
DELIVERY MONITORING
- Fill is coming from an approved site.
- Daily inspection log filled in for every truck load of fill entering the site.
- Record the truck licence plate and size (truck, truck and pony, and/or truck and trailer).
- Look at fill – no garbage, wood waste, concrete, asphalt, or other non-soil materials.
- Smell fill – no odours stronger than "garden" – no gasoline, diesel, or unusual odours.
FILL PLACEMENT
- If the fill arrives wet, it is stockpiled to allow it to dry.
- Water is available to moisten soil to aid in packing and dust control.
- Each load is levelled into a thin layer and packed well.
- Soil is packed hard so that walking and driving on it is easy.
Appendix 5: Example of a Fill Tracking Slip
Note: Be sure to update this form as best practices change.
Fill Tracking Slip
Date ________________________________________________
Fill Permit Number ________________________________________________
Trucking Company ________________________________________________
Truck Licence Plate ________________________________________________
Fill Site Location ________________________________________________
Fill Cell ________________________________________________
Generating Site Address ________________________________________________
Time of Departure from Generating Site ________________________________________________
Time of Arrival at Fill Site ________________________________________________
Received By ________________________________________________
Only clean, uncontaminated soil is acceptable on reserve lands. NO garbage, demolition waste, or any other potentially contaminated material can be unloaded or dumped. Violators will remove all unacceptable materials immediately at their cost.
Fill Cell: Sometimes, people choose to divide their fill areas into sections, called fill cells, and mark them with Global Positioning System (GPS) coordinates. This can help you find specific loads of fill later in the project timeline.
Appendix 6: Fill Management Projects at a Glance
Fill Management Projects at a Glance
Balancing Opportunities, Safety, and Environmental Stewardship
Quick Tips and Checklists to Get you Started
Before The Project Starts
- Read the British Columbia First Nations' Fill Management Guide
- Contact the Environment and Natural Resources Unit at Indigenous Services Canada, BC Region
- Consult a qualified professional for guidance (e.g., a lawyer, geotechnical engineer, environmental consultant, etc.)
- Know what kind of fill you need for your project
- Make sure that the fill you receive won't be dumped within 30 metres of any waterbodies
- Know your legal rights and responsibilities
- Understand and prepare the paperwork and contracts that you'll need to protect you and the land
- Have the appropriate equipment to receive, spread, and pack the fill
Red Flags
If you encounter any of the following, stop your project immediately and call a qualified professional for guidance
- Fill that smells like rotting waste, gasoline, diesel, sulphur, other chemicals, or any other unusual smells
- Fill that is discoloured (e.g., shades of yellow or green) or that is visibly stained with oil or grease
- Fill that contains garbage of any kind (e.g., food waste, plastics, metals, glass, etc.), construction waste, wood waste, concrete, and anything else that isn't topsoil or mineral soil
- If someone offers to pay you cash if you take their fill
- If you suspect that the fill came from a nearby industrial or known contaminated site
- If someone asks to place a single load of fill at your site with no record of where it came from
- If a load of fill is brought to your site without the necessary soil tracking forms
DISCLAIMER
This fact sheet does not include all of the requirements that must be followed during the life of a fill project. As a fill receiver, it is your responsibility to ensure that all applicable legislation, regulations, First Nations' by-laws, standards, and guidelines are followed. For more information, contact the Department of Indigenous Services Canada, BC Region at 604-775-5100 (local), 1-800-567-9604 (toll-free), or via infopubs@aandc-aadnc.gc.ca.